Tuesday, 9 September 2025

Create Email Body In Jenkins Using Editable Email Notification Plugin

 Problem Statement - 

After publishing test result in Jenkin's post build action any xunit plugin such as publish Junit/TestNG restult. One may want to create simple mail to stake holders quantifying test execution status. 

Email body may be typically in html format with rows and columns with columns for total tests/pass/fail/skip...

Solution #1 - Use of Default Content (Simple Information Without Test Count Status - Total/Pass/Fail/Skip) -

Challenge with default content approach - 

While default content can write Job/build/Jenkins URL seamlessly, it struggles to get details regarding test success count (Total/Pass/Fail/Skip).

content of default content can be like below - 

"""

$JOB_NAME ($BUILD_NUMBER) - $BUILD_URL

<!DOCTYPE html>

<html>

<head>

<style>

table {

  font-family: arial, sans-serif;

  border-collapse: collapse;

  width: 100%;

}

td, th {

  border: 1px solid #dddddd;

  text-align: left;

  padding: 8px;

}

tr:nth-child(even) {

  background-color: #dddddd;

}

</style>

</head>

<body>

<h3>$JOB_NAME - $BUILD_NUMBER - $BUILD_STATUS!</h3>

<table>

  <tr>

    <th>Job Name</th>

    <th>Build Number</th>

    <th>Jenkins URL</th>

  </tr>

  <tr>

    <td>$JOB_NAME</td>

    <td>$BUILD_NUMBER</td>

    <td>$BUILD_URL</td>

  </tr>

</table>

</body>

</html>

"""

Solution #2 - Use Of Pre-Send Script (Under Advanced Section Of Editable Email Notificaction) to read job/build/test status programmatically using Jenkins hudson library)

Following groovy script has to be added - 

/***
Challenge - Since, script interacts with hudson library Jenkins restricts accessing hudson layer directly. 
Script and various hudson methods have to be explicitly approved in Jenkins in-process Script Approval plugin

***/

def testResult = build.getAction(hudson.tasks.junit.TestResultAction.class)
def totalCount = "NA", failCount = "NA", skipCount = "NA", passCount = "NA", fail_per = "NA", skip_per = "NA", pass_per = "NA"
def job = build.getProject().getName()
def build_number = build.getNumber()
def build_status = build.getResult()
def build_url = build.getUrl()

if (testResult != null) {
   logger.println("test result found")
    totalCount = testResult.getTotalCount()
    failCount = testResult.getFailCount()
    skipCount = testResult.getSkipCount()
    passCount = totalCount - failCount - skipCount
    
    fail_per = (totalCount > 0) ? ((failCount / totalCount) * 100).intValue() : 0
    skip_per = (totalCount > 0) ? ((skipCount / totalCount) * 100).intValue() : 0
    pass_per = 100 - (fail_per + skip_per)


    def failed_tests_refs_rows = ""
    def text_to_strip = "Ubicquia_Tests.Test_Components.Framework_Update."
    def counter = 0
    if(failCount>0) {
     logger.println("---------------------------------------------------------------Failed Tests Details For ${failCount} Tests Are Printed Below---------------------------------------------------------------------------------------------------------------:")
    def failedTests = testResult.getFailedTests()
        failedTests.each { test ->
        counter = counter + 1        
        def name = test.getName() // Test method name
        def className = test.getClassName() // Fully qualified class name
        className = className - text_to_strip
        def errorDetails = test.getErrorDetails() // Error message
        logger.println("${counter } -> Test Fails -> ${className}  \nError Details -> ${errorDetails}")
        def row_background = (counter %2 ==0)? "style='background-color: #e6f3ff;'": "" //set light blue for alternate row starting from
        failed_tests_refs_rows = failed_tests_refs_rows + "<tr ${row_background}><td>${counter}</td><td>${name}</td><td style='text-align: left;'>${className}</td><td style='text-align: left;'>${errorDetails}</td></tr>"
    }
 logger.println("---------------------------------------------------------------Failed Tests Details For ${failCount} Tests Ends---------------------------------------------------------------------------------------------------------------:")
}

    def summary = """

<!DOCTYPE html>
<html>
<head>
<style>
table {
  font-family: arial, sans-serif;
  border-collapse: collapse;
  width: 100%;
}

td, th {
  border: 2px solid #dddddd;
  text-align: center;
  vertical-align: middle;
  padding: 8px;
}


</style>
</head>
<body>

<table>
<table>
<tr><td><h3>${job} - ${build_number} - ${build_status}</h3></td></tr>
</table>

<table>
  <tr><th>Jenkins URL</th><th>Total Tests</th><th>Total Pass</th><th>Total Fail</th><th>Total Skip</th></tr>
  <tr><td style='text-align: left;'><a href='${build_url}'>${build_url}</td><td>${totalCount}</td><td>${passCount} ( ${pass_per}% )</td><td>${failCount} ( ${fail_per}% )</td><td>${skipCount} ( ${skip_per}% )</td></tr>
</table>

<table class='details-table'>
<tr><th>Serial Number</th><th>Failed Tests</th><th>Class Name</th><th>Error Details</th></tr>${failed_tests_refs_rows}

</table>
</table>
</body>
</html>
   """.toString()
    
msg.setContent(summary, "text/html")
   
}
else{
logger.println("test result not found")
}
 logger.println("Test results: Total Test =${totalCount}, Total Passed=${passCount} (${pass_per}%), Total Failed=${failCount} (${fail_per}%), Total Skipped = ${skipCount} (${skip_per}%)")

Solution #3 - Using Macro/Environment Variable Set By test is published. (Yet To Be Verified For Test Counts...)


Job Name: $JOB_NAME
Build Number: $BUILD_NUMBER
Build URL: $BUILD_URL
Total Tests: ${TEST_COUNTS,var="total"}
Passed: ${TEST_COUNTS,var="pass"}
Failed: ${TEST_COUNTS,var="fail"}
Skipped: ${TEST_COUNTS,var="skip"}

Tuesday, 8 August 2023

Jenkins - Build Steps - Execute Windows batch command - pytest

::echo off

echo test_product=%test_product%

echo test_env=%test_env%

echo list_devices=[%list_devices%]

echo total iteration=%ota_iterations%

echo total max attempts=%ota_max_attempt%

set test1=KPI_Scripts\UbiCell\%KPM_Tests%

echo test1=%test1%

echo is_test_result_to_be_uploaded_on_cloud=%is_test_result_to_be_uploaded_on_cloud%

pytest %test1% -n=%NumberOfThreadsForOTAIterations% --junitxml="./Reports/reports.xml" --html="./Reports/reports.html" 

Jenkins Groovy Function To Be Used by Active Choice Parameter - To Have Auto Selected Based On Certain Logic


Jenkins Groovy Function To Be Used by Active Choice Parameter - To Have Auto Selected Based On Certain Logic

def get_list(x,delimiter,item_to_be_selected,bool_is_selected=false) {

    list_selected = null

    if(x!=null && x.length() > 0) {

        list = x.split(delimiter)

        list_selected = []

        for(int i=0;i<list.size();i++){

            if(bool_is_selected){

                if(list[i].trim().equals(item_to_be_selected)){

                     list_selected[i] = list[i].trim() + ':selected'


                    }

                else {

                    list_selected[i] = list[i].trim()

                }

            }

            else {

                list_selected[i] = list[i].trim()

            }


        }


    }

     return list_selected

}


Calling the function - return get_list(list_ota_servers,'-','t:98,d:http://updqa4.ubicquia.com',true)

Tuesday, 25 July 2023

Regular Expression For Exclusion

 Regular expression for exclusion

Regular expression can be applied for excluding certain words - 

1. Use (?!<word to be excluded>)

2. (?i) to make cases insensitive

Example - discarded and template to be excluded where (?i) indicates being case insensitive

(?i)(?!.*discarded.*)(?!.*template.*)(.*ubicell.*) 

Saturday, 22 July 2023

Regular Expression - How To Create Regular Expression For Case Insensitive

 How To Create Regular Expression For Case Insensitive


  1. Use Simple Regular Expression Syntax - (?i)<Normal Regular Expression>
    • (?i) -> Indicates Case Insensitive Regular Expression
  2. Use Language And Technology To Use Library/Methods/Interface To Pass Additional Parameter As             Flag To Determine If Case Sensitive Or Case InSensitive Comparison Is Required. 
  • FindPattern(<regular expression>, caseSensitiveFlag(True/False))

Tuesday, 30 May 2023

MQTT Protocol - IOT Design Approach

Original Source - https://www.javatpoint.com/mqtt-protocol

 MQTT stands for Message Queuing Telemetry Transport. MQTT is a machine to machine internet of things connectivity protocol. It is an extremely lightweight and publish-subscribe messaging transport protocol. This protocol is useful for the connection with the remote location where the bandwidth is a premium. These characteristics make it useful in various situations, including constant environment such as for communication machine to machine and internet of things contexts. It is a publish and subscribe system where we can publish and receive the messages as a client. It makes it easy for communication between multiple devices. It is a simple messaging protocol designed for the constrained devices and with low bandwidth, so it's a perfect solution for the internet of things applications.

Current MQTT Version - MQTT 5.0, developed and managed by OASIS.

Journey - MQTT 3.1 -> MQTT 3.1.1 (Backward Compatible) -> MQTT 5.0 (Not Backward Compatible)

The major functional objectives in version 5.0 are:

  • Enhancement in the scalability and the large-scale system in order to set up with the thousands or the millions of devices.
  • Improvement in the error reporting

Characteristics of MQTT

The MQTT has some unique features which are hardly found in other protocols. Some of the features of an MQTT are given below:

  • It is a machine to machine protocol, i.e., it provides communication between the devices.
  • It is designed as a simple and lightweight messaging protocol that uses a publish/subscribe system to exchange the information between the client and the server.
  • It does not require that both the client and the server establish a connection at the same time.
  • It provides faster data transmission, like how WhatsApp/messenger provides a faster delivery. It's a real-time messaging protocol.
  • It allows the clients to subscribe to the narrow selection of topics so that they can receive the information they are looking for.

MQTT Architecture


To understand the MQTT architecture, we first look at the components of the MQTT.

  • Message
  • Client
  • Server or Broker
  • TOPIC

Message

The message is the data that is carried out by the protocol across the network for the application. When the message is transmitted over the network, then the message contains the following parameters:

  1. Payload data
  2. Quality of Service (QoS)
  3. Collection of Properties
  4. Topic Name

Client

In MQTT, the subscriber and publisher are the two roles of a client. The clients subscribe to the topics to publish and receive messages. In simple words, we can say that if any program or device uses an MQTT, then that device is referred to as a client. A device is a client if it opens the network connection to the server, publishes messages that other clients want to see, subscribes to the messages that it is interested in receiving, unsubscribes to the messages that it is not interested in receiving, and closes the network connection to the server.

In MQTT, the client performs two operations:

In MQTT, the client performs two operations:

Publish: When the client sends the data to the server, then we call this operation as a publish.

Subscribe: When the client receives the data from the server, then we call this operation a subscription.

Server

The device or a program that allows the client to publish the messages and subscribe to the messages. A server accepts the network connection from the client, accepts the messages from the client, processes the subscribe and unsubscribe requests, forwards the application messages to the client, and closes the network connection from the client.

TOPIC

MQTT protocol

The label provided to the message is checked against the subscription known by the server is known as TOPIC.

Now we will look at the architecture of MQTT. To understand it more clearly, we will look at the example. Suppose a device has a temperature sensor and wants to send the rating to the server or the broker. If the phone or desktop application wishes to receive this temperature value on the other side, then there will be two things that happened. The publisher first defines the topic; for example, the temperature then publishes the message, i.e., the temperature's value. After publishing the message, the phone or the desktop application on the other side will subscribe to the topic, i.e., temperature and then receive the published message, i.e., the value of the temperature. The server or the broker's role is to deliver the published message to the phone or the desktop application.

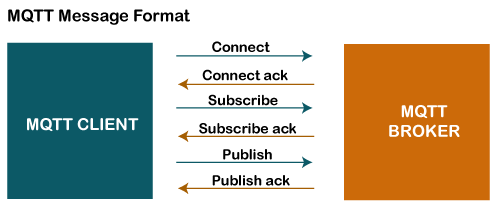
MQTT Message Format

MQTT protocol

The MQTT uses the command and the command acknowledgment format, which means that each command has an associated acknowledgment. As shown in the above figure that the connect command has connect acknowledgment, subscribe command has subscribe acknowledgment, and publish command has publish acknowledgment. This mechanism is similar to the handshaking mechanism as in TCP protocol.

Now we will look at the packet structure or message format of the MQTT.

Sunday, 14 May 2023

Problem Statement - Jenkins HTML Pubisher Does Not Display HTML Reports Properly With CSS

By default, Jenkins latest version displays Extent Report or any html report with CSS in normal text, as Extent Report or any html report with CSS contains scripts which pose threat to web security. 

To overcome the problem, we have to override property - hudson.model.DirectoryBrowserSupport.CSP

There are 2 options available - 

1. Pass Parameter While Invoking Jenkins With War File - 

    java -Dhudson.model.DirectoryBrowserSupport.CSP="" -jar jenkins.war

2. Configure Jenkins 

    1.     Go to http://localhost:8080/ using admin credentials

2.     Click on Manage Jenkins link.

3.     Click on Script Console.

4.     Type below Syntax in Script Console and click on Run link.

            System.setProperty("hudson.model.DirectoryBrowserSupport.CSP", "")